This website uses cookies so that we can provide you with the best user experience possible. Cookie information is stored in your browser and performs functions such as recognising you when you return to our website and helping our team to understand which sections of the website you find most interesting and useful.
Get Started With Advanced Posts Listing

Sandeep Kumar Mishra
September 14, 2024
5 minutes read
Welcome to Advanced Posts Listing, a powerful Gutenberg block plugin designed to help site administrators seamlessly create and display visually stunning blog post listings or custom post type listings directly from the Gutenberg editor. With five beautiful and responsive design layouts to choose from, this plugin ensures that your listings not only look great but are also fully customizable.
Site admins can easily select custom post types from the block properties, with the listings generated accordingly,all while enjoying a live preview of their changes. Additionally, Advanced Posts Listing offers robust filtering options, allowing admins to refine listings by taxonomy, terms, and other criteria. The information displayed within each listing is fully manageable from the block properties, providing complete control over your content presentation.
Follow these simple steps to set up this plugin:
-
- Step 1: Unzip the downloaded file and upload the advanced-posts-listing directory to the /wp-content/plugins/ folder.
- Step 2: Once the plugin is uploaded, log into the WordPress back-end and go to the Plugins page.
- Step 3: Find the Advanced Posts Listing plugin and click Activate.

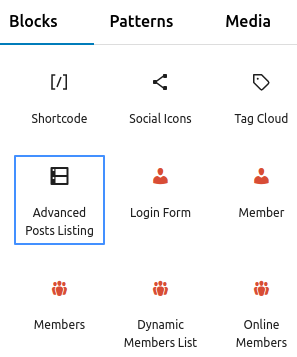
- Step 4: Advanced Posts Listing can be found under the Widgets category when you click on the plus icon to add a Gutenberg block on the page.
- Step 5: Choose a Section: Our plugin offers three main sections to configure:
Option 1: Layout Settings
Option 2: General Settings
Option 3: Elements Settings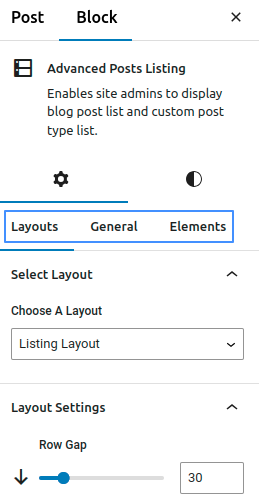
Adjust and Manage Layout Settings
-
- Select a Layout: In the Layout Settings section, you have five layout options to choose from based on your needs:
Option 1: Listing Layout
Option 2: Grid Layout
Option 3: Overlay Layout
Option 4: Masonry Layout
Option 5: Slider Layout - Step 2: Pick the Desired Layout: Choose any of these layouts according to your requirements and proceed with further customization.
- Step 3: After completing these steps, click on the “Save Settings” button.
- Select a Layout: In the Layout Settings section, you have five layout options to choose from based on your needs:
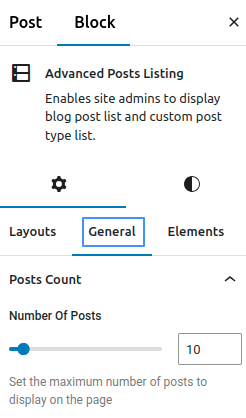
Adjust and Manage General setting
-
- In the General Settings, you can manage the following options using various controls:
- In the General Settings, you can manage the following options using various controls:
Post Count: Set the maximum number of posts to display on the page.
Data Source: Filter posts by categories, tags, and custom taxonomies.
Post Sorting: Sort posts by options such as newest to oldest, oldest to newest, A-Z, or Z-A.
Include and Exclude Posts: Enter comma-separated IDs of posts (e.g., 23, 45, 16) to be included or excluded. Only these posts will be displayed.
Pagination Settings: Add pagination and edit pagination labels.
Adjust and Manage Elements Settings
- In the Elements tab, you can modify the following settings using toggle switches:
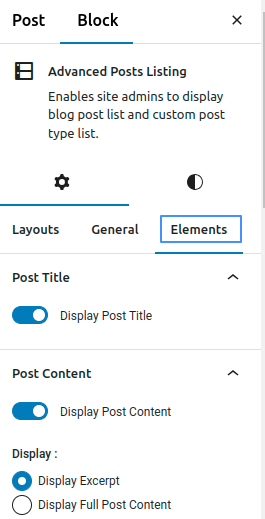
Post Title: If enabled, the post title will be displayed. If disabled, the title will be hidden.
Post Content: If enabled, the post content will be displayed. If disabled, the content will be hidden.
Post Meta: Display post meta information.
Featured Image: If enabled, the featured image will be displayed. If disabled, the image will be hidden.
Display Styling for Button: You can customize the button’s background color and text color.
Explore the latest in WordPress
Trying to stay on top of it all? Get the best tools, resources and inspiration sent to your inbox every Wednesday.