This website uses cookies so that we can provide you with the best user experience possible. Cookie information is stored in your browser and performs functions such as recognising you when you return to our website and helping our team to understand which sections of the website you find most interesting and useful.
You could display your store location by drawing on a map. You can create multiple shapes for defining your delivery area and display them on the map. You can Highlight areas on maps with your own colors and display custom information on click.
Please follow these steps to manage polygon’s properties.
Step 1: Please navigate to the “WP Delivery Area Plugin -> Add Collection” page, go to the “Draw Product Delivery Area (Optional)” section.
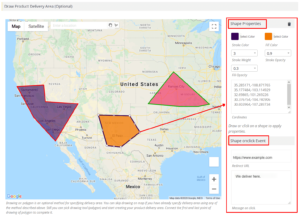
Step 2: Please click on the given tool “Draw a shape” and start creating your product delivery area on the map.
Step 3: Please connect the first and last point of drawing of the polygon to complete it, after creating the shape you can customize it as per your requirement.
Step 4: To modify shape properties, click on the shape and you’ll see options on the right side.

Step 5: Please customise the shape property using the below give information.
Shape Properties: Using this property you can manage shape properties.
- Stroke Color : You can set shape outline color in this property.
- Fill Color : Using this property you can change the fill color of shape as per your requirement
- Stroke Weight : Sets the thickness of outlines drawn by stroke.
- Stroke Opacity : The stroke-opacity attribute specifies the opacity of the outline on the current shape.
- Fill Opacity : This attribute specifies the opacity of the fill color.
- Coordinates : If you have coordinates you can manually create shape and also change shape design doing changes in given coordinates.
Step 6: Set the shape on click event using below given information.
Shape onclick Event: Using this property you can display the message on click in shape onclick event and also redirect the user on any page as per your requirement.
- Please point to the ‘Shape onclick Event’ and Enter the link of your URL in the box. When the user clicks on the shape he will be redirected on the entered URL page.
- If you want to display the message on click please enter info. in given ‘Message on click’ textarea.
Step 7: After you modify shape property please click on ‘Save Collection’.
Explore the latest in WordPress
Trying to stay on top of it all? Get the best tools, resources and inspiration sent to your inbox every Wednesday.
