This website uses cookies so that we can provide you with the best user experience possible. Cookie information is stored in your browser and performs functions such as recognising you when you return to our website and helping our team to understand which sections of the website you find most interesting and useful.
Manage Shortcode Delivery Area Form UI Settings

Sandeep Kumar Mishra
April 22, 2020
5 minutes read
The delivery area verification form, which is displayed on WooCommerce pages, is fully responsive and can be customized directly from the plugin settings. You have the flexibility to tailor the appearance of the delivery area form to your specific needs and select a template that suits your preferences.
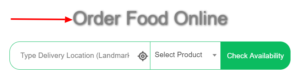
To showcase the delivery area verification form on the frontend, you can effortlessly use the following shortcode: [delivery_area_form]. Simply insert this code into any page, post, or widget where you’d like to display the form. The form’s appearance and functionality can be adjusted according to your requirements, following the settings provided by the plugin.

You can customize the above given shortcode delivery area form from the plugin setting page according to your requirements.
Please follow these steps to customize shortcode delivery area form template and form UI settings.
Step 1: Please navigate to the “WooCommerce Delivery Area Pro -> Plugin Settings” page scroll down to the “Choose Template For Delivery Area Enquiry Form (Shortcode)” and customize it according to your requirements. You could change the form template by selecting another template.

Step 2: After a small process please click on Save Settings, you could see your selected form layout displayed on frontend where you display your shortcode form page.

Manage Form UI Settings:

- Form Preview: To check the Preview of the selected search form
- Delivery Area Search Title: Enter delivery Area Search Title
- Delivery Area Search Placeholder: Please enter the delivery area search placeholder which is displayed on the blank search box.

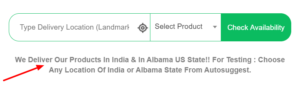
- Delivery Area Form Description: Please enter the delivery area form description which shows under the search box. You could display brief summary of your store shipping process.
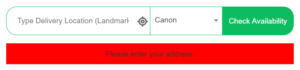
- Empty Address Message: Please enter the delivery area empty address message which shows when customer’s not entered any address on the search box.
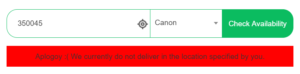
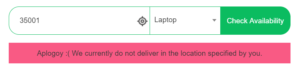
- Not Shipping Area Message: Please enter the error message for not shipping available on customer’s location which shows when customer’s location not available for shipping.
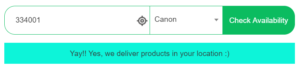
- Shipping Area Message: Please enter the shipping area message which is displayed when shipping is available on the customer’s location.

- Button Label: Please enter button label text according to you.

- Success Message Color: Please select a success message background color, which is displayed when the entered location is available for delivery.
- Error Message Color: Please select an error message background color, which is displayed when the entered location is not available or a customer’s find blank location search box for delivery.
- Button Text Color: Please select button text color as per your choice. Which is displayed on delivery area form button’s label color.

- Button Background Color: Please select delivery area form button’s background Color.

- Enable Locate Me Button: Please tick enable the given checkbox to display ‘Locate Me Button’ on check delivery area form.

- Enable Product Listing: Please tick enable the given checkbox to display ‘Enable Product Listing’ on check delivery area form.
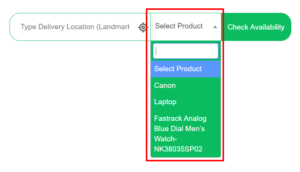
- Product Listing Error Message: Please tick ‘Product Listing Error Message’. This message is displayed when customer not selected any product from ‘Select Product’ dropdown.

- Delivery Available Redirect URL: Enter URL for redirecting when delivery is possible
- Delivery Not Available Redirect URL: Enter URL for redirecting when delivery is not available
Please do changes as per your requirement and click on Save Settings.
- Button Background Color: Please select delivery area form button’s background Color.
Explore the latest in WordPress
Trying to stay on top of it all? Get the best tools, resources and inspiration sent to your inbox every Wednesday.