In this tutorial, you’ll learn how to start block development in WordPress in easy steps. Block development in WordPress centers on a Block-based content editor known as the Gutenberg Editor. The Gutenberg editor uses blocks to create content and offers more flexible and visually consistent content than the classic editor. It is a more modern and advanced editor that replaced the traditional classic editor.
Importance of Gutenberg Blocks
- Gutenberg blocks have an intuitive interface and are user-friendly, making it easy to modify content without the knowledge of coding skills.
- It is also very flexible, it allows for the easy rearrangement and customization of blocks
- It allows for the reuse of block layouts, thereby speeding up content creation.
- Gutenberg editor ensures a consistent editing experience across various content and pages.
- It also allows embedding videos, images, and likes from various sources like YouTube, Twitter, and Instagram.
- Developers can easily create custom blocks tailored to specific needs
- It also encourages modern development practices via the usage of JavaScript, react, and many other relevant technologies
- The importance of Gutenberg is not limited to the above, it represents an advancement in WordPress that brought about extensive benefits both to users and developers even businesses and the broader digital landscape.
This guide is meant for developers, freelancers, educators, content creators, technical content creators, and WordPress enthusiasts.
What are the prerequisites for Block Development in WordPress?
To develop blocks effectively, you need to know several programming languages which include;
- React
- HTML/CSS/JAVASCRIPT
- PHP
Setting Up the Development Environment
To create a development environment for block and WordPress development, you’ll need the following:
Understanding Gutenberg Blocks.
Gutenberg blocks are the basic/primary units of content within the WordPress block editor. It was introduced to WordPress in version 5.0. It provides a more flexible and visual way to create content using the block-based approach. It has changed how content is created and managed in WordPress, its approach to content creation and management is more modernized. It enhances your experience as a user with extensive customization choices and a broad range of content layouts and types.
The Gutenberg Block Editor differs significantly from the Site Editor, and understanding these differences is crucial. Read our comprehensive guide on Site Editor vs. Block Editor to learn more.
Anatomy of a Block
Now let’s take a look at the Key components and structure of a Block.
A block is known to be the modular unit of content that can be inserted, edited, rearranged, and styled within a WordPress block editor. In simple terms, they are the smallest unit of content that can be integrated to form a whole content. However, they can act independently.
Key Components of a Block:
The key components of a block include;
- Block types e.g Paragraph block
- Content area for the input and editing of content
- Block tools bar
- Block setting
- HTML output
- Style and classes
- Reusable blocks
Structure of a block
Each block is structured to have save functions, edit functions, attribute functions (appearance), styles functions, metadata, Icon, and categories.
Block types
There are various types of blocks in the WordPress block editor they include;
- Common blocks e.g. paragraph blocks, heading blocks, list blocks, image blocks, and likes. Mostly used for writing introductions, and headings, it is also used to insert photos, illustrations, graphics, etc. It can also be used for itemizing lists in a bulleted or numbered form.
- Layout Element Blocks e.g. column block. It can be used to create multiple columns and join multiple blocks together for styling and layout reasons.
- Formatting blocks e.g. code block. A code block can be used to display code snippets and also to embed custom HTML code.
- Widget blocks e.g. Archive block. Widget blocks are conventionally used to display recent comments, for showing a list of posts achieved by month or year.
- Reusable blocks. This allows for the re-usage of blocks or layouts across multiple posts or pages.
- Embedding blocks for adding content from other platforms, highlighting recent blog posts or updates, and embedding YouTube videos to enhance multimedia content.
- Experimental blocks. This block is used for testing new features.
There are other different types of blocks but for this blog, this should suffice. To learn more about using these blocks, check out our post on the basics of the block editor.
Setting Up Development Environment
The first thing to do when setting up your development environment is to install the required software (Node.js and npm). For you to install this visit the official Node.js website, when you visit the site you will see a button for download, download it, and install it on your PC.
The next thing to do is to install WordPress if you haven’t before.
Create Your First Block
There are plenty of ways to dive into block development, but here’s a straightforward, highly recommended method to get started with creating blocks in WordPress. Follow these simple steps and you’ll be developing your own blocks in no time.
Step 1 – Set Up Your Block Plugin
Navigate to your wp-content/plugins directory and run this command in your terminal:
npx @wordpress/create-block@latest hello-world-block
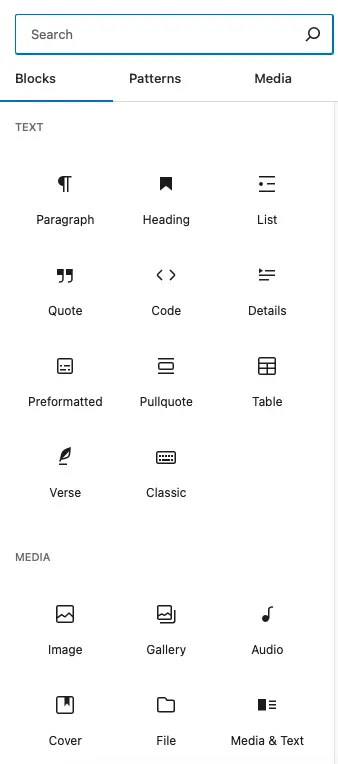
This command installs the create-block package (if not already installed) and sets up a block plugin complete with all essential files and folders. Once installed, activate the plugin and check out the Gutenberg editor. You’ll find a new “Hello World Block” component in the widgets section.
Step 2 – Customize Your Block Plugin
To start customizing your block plugin, familiarize yourself with the generated file and folder structure. The create-block package produces the following key files and directories:
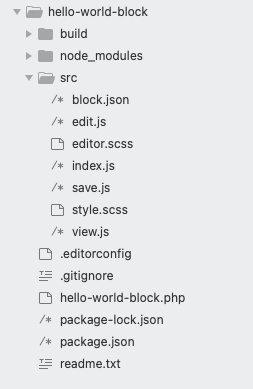
Here’s a quick rundown of the important files and folders for block development:
- hello-world-block.php: The main PHP file that registers your block as a WordPress plugin.
- src/block.json: Defines the block’s properties, like its name, category, and icon.
- src/edit.js: Handles the block’s editor interface within the Gutenberg editor.
- src/index.js: Registers your block and ties all the components together.
- src/save.js: Specifies how the block’s content is saved and displayed on the front end.
- src/style.scss: Contains front-end styles for your block.
- src/editor.scss: Contains editor-specific styles for your block.
- build: Holds the production-ready files created when you run the
npm build command.
Before making any changes, run the following command to watch for file updates:
npm start
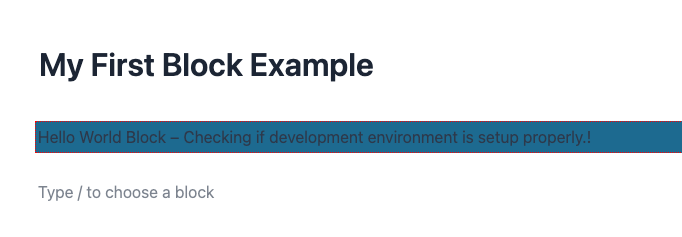
Next, open src/edit.js and modify the Edit() function to test your development environment.
export default function Edit() {
	return (
		<p { ...useBlockProps() }>
			{ __(
				'Hello World Block – Checking if development environment is setup properly.!',
				'hello-world-block'
			) }
		</p>
	);
}
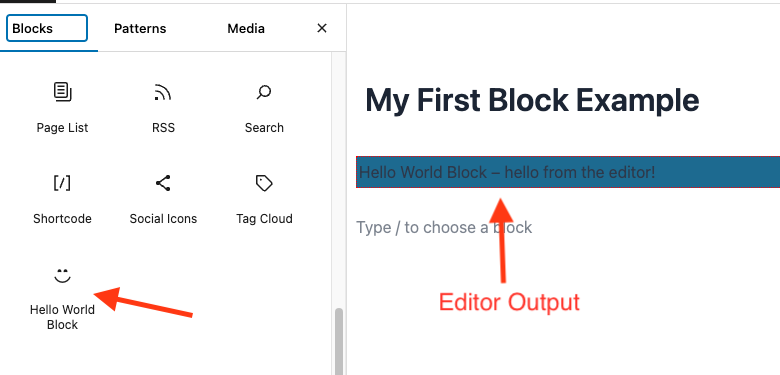
Now, when you drag the Hello World Block component into the content area, you’ll see the following output.
Step 3: Styling Your Block
The default background is ugly in this hello world block. Right? Open the src/style.scss and change the styling of the block output.
.wp-block-create-block-hello-world-block {
	background-color: #f1f1f1;
	color: #000;
	padding: 10px 5px;
}
What if we add a backend setting to modify the text color? let’s do this.
Open the src/block.json and just add the color properties in supports dictionary.
{
	"$schema": "https://schemas.wp.org/trunk/block.json",
	"apiVersion": 3,
	"name": "create-block/hello-world-block",
	"version": "0.1.0",
	"title": "Hello World Block",
	"category": "widgets",
	"icon": "smiley",
	"description": "Example block scaffolded with Create Block tool.",
	"example": {},
	"supports": {
		"html": false,
		"color": {
			"background": false,
			"text" : true
		}
	},
	"textdomain": "hello-world-block",
	"editorScript": "file:./index.js",
	"editorStyle": "file:./index.css",
	"style": "file:./style-index.css",
	"viewScript": "file:./view.js"
}
and you’re done! Below is the expected output.
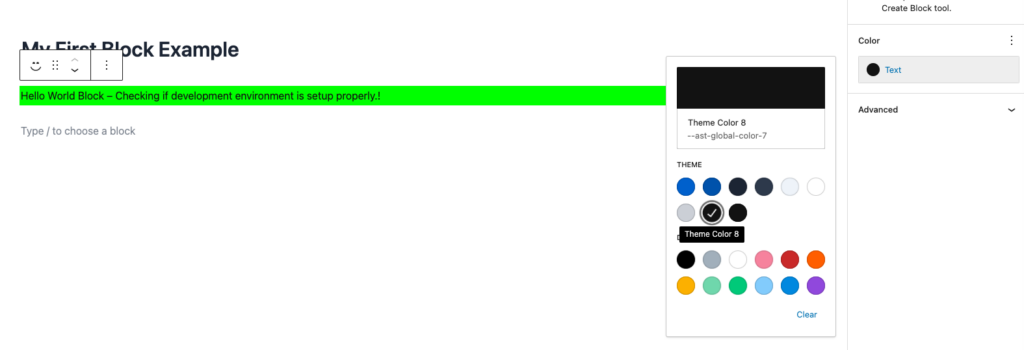
Now can you add settings to modify the background color? You got it right! just change “background”: false to “background”: true
Next, We will be looking at how to customize the block edit component, add block attributes, implement block controls and inspector settings, and save and render block content.
How to Use Block Attributes
In addition to the built-in settings for colors, background, typography, and more, you can also add your own custom settings. In this example, we’ll add a content input box to modify the content of the block. Follow these steps:
- Add Attribute in the block.json
- Add Block settings
- Access Attributes in the Edit Component
Add Attribute in the block.json
Open src/block.json and add a custom content attribute as shown below. This will store the user’s input in the content variable, which we’ll use in the Edit() function in edit.js.
"attributes": {
		"content": {
			"type": "string"
		}
	},
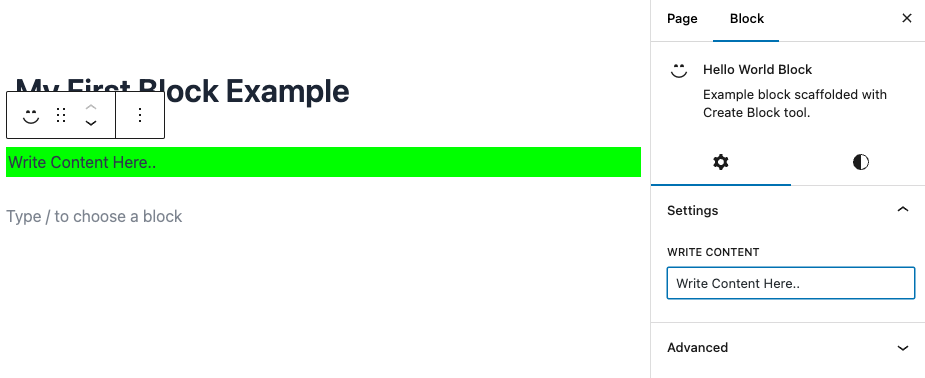
Add Block Settings
To create a text input for this content, we’ll use InspectorControls, PanelBody, and TextControl components. Here’s the modified code in edit.js:
import { __ } from '@wordpress/i18n';

import { InspectorControls,useBlockProps } from '@wordpress/block-editor';
import { PanelBody, TextControl, ToggleControl } from '@wordpress/components';

import './editor.scss';

export default function Edit( { attributes, setAttributes } ) {

	const { content } = attributes;

	return (
		<>
			<InspectorControls>
                <PanelBody title={ __( 'Settings', 'hello-world-block' ) }>
                    <TextControl
                        label={ __(
                            'Write Content',
                            'hello-world-block'
                        ) }
                        value={ content || '' }
                        onChange={ ( value ) =>
                            setAttributes( { content: value } )
                        }
                    />
                </PanelBody>
            </InspectorControls>

            <p { ...useBlockProps() }>
				{ content }
			</p>
		</>

	);
}
After saving, you should see a content setting as shown below:
Access Attributes in the Edit Component
To access the attributes defined in block.json, pass attributes and setAttributes to the Edit() function.
export default function Edit( { attributes, setAttributes } ) {

const { content } = attributes;
// TODO

}
Next, use setAttributes to assign the value of the content on text input change.
<TextControl
                        label={ __(
                            'Write Content',
                            'hello-world-block'
                        ) }
                        value={ content || '' }
                        onChange={ ( value ) =>
                            setAttributes( { content: value } )
                        }
                    />
Finally, use the content variable to output in the paragraph.
<p { ...useBlockProps() }>
				{ content }
			</p>
With this approach, you can easily add custom attributes and access them in the Edit file to further customize your block.
Though, you need to make changes in save.js as well otherwise you’ll not see saved changes in the frontend. Same as edit.js, we have to pass the attributes and then use the content variable to output.
import { useBlockProps } from '@wordpress/block-editor';

export default function save( { attributes, setAttributes }) {
	const {content} = attributes;
	return (
		<p { ...useBlockProps.save() }>
			{ content }
		</p>
	);
}
Advanced Block Development
The usage of the React component on your blocks.
React components are reusable pieces of code that do the description of a part of the user interface in a React application.
There are two types of React components, they include;
Class and Function react components.
The class react component determines the usage of class ES6.
The function react component determines the usage of JavaScript functions.
To create a react component, it is important to know which of the types you are creating.
The function react component is easy to create and is used when you don’t want to manage methods. While class react is used when you want to manage methods.
Handling dynamic data with API requests
Here are the steps involved in handling dynamic data with API requests.
- Decide which of the Https library to use for the request. You can use Axios but it is optional.
- Decide which of the components to use to fetch and display the request from the API. In other words, decide whether to use class or function component.
- After, you then fetch the data from API.
- Then you test to check if the API has been integrated. To know if it has been successfully integrated or not, or if it has an error or still loading.
- After it is successfully integrated, then you build and deploy to your host environment.
Enhancing Block Development
When you talk about enhancing the functionality and customization options of a custom block then you are referring to custom control and inspection panel.
Custom Control allows for direct integration into the block toolbar or sidebar. custom controls allow users to customize the block’s settings or content directly within the editor interface, and they include;
- Color picker for color
- Text control for text
- Checkbox control
- Select-control
- Toggle control
Inspector Panel: they are sections within the block sidebar that provide a more detailed view or editing capabilities beyond what is made available in the toolbar of the block. They have additional settings related to the block. However, they are defined using a panel body from the WordPress component library.
Handling Media Uploads and External Resources
Before you handle any media uploads, you first need to add some features that encourage users to upload media files like videos, images, and likes, and also add links to an external resource e.g. URLs.
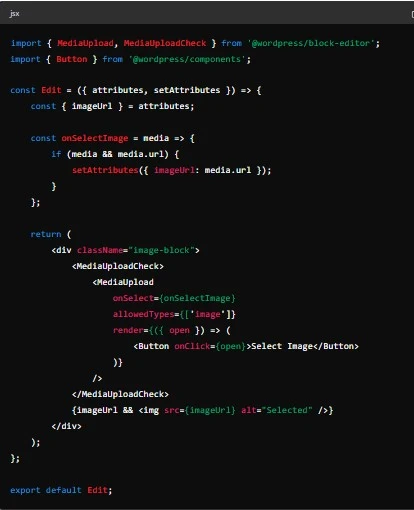
WordPress provides built-in support for handling media uploads through the Media Library. Custom blocks can leverage this functionality using the MediaUpload component from @wordpress/block-editor and @wordpress/components.
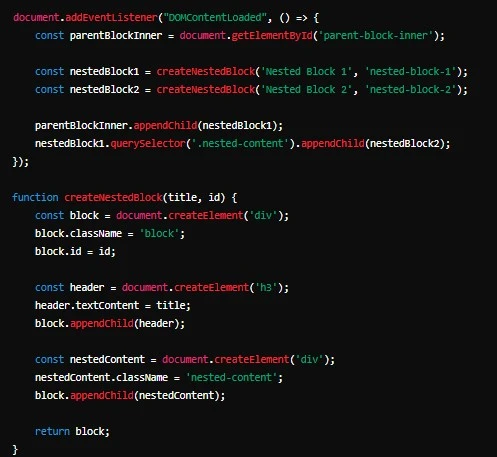
How to Implement Inner Blocks for Nested Content
A nested content is referred to as a content structure where elements are embedded in other elements hierarchically. It allows for the embedding of blocks within another block. Thereby creating more complex and organized layouts.
How do you implement it? To implement an inner block for nested content, you are required to get two blocks.
- The parent block
- The inner block
After you have gotten the blocks, you then register the parent block. To do this, Simply create a Javascript file for your block and name it parent-block.js. After the registration is successful, you specify the block you want to be nested inside the parent block in the InnerBlocks component, your code should look like this.
The next thing is to style the block. You can style the block by creating a CSS file to style both the parent block and the nested block.
However, note that you can separately register the parent clock and the nested block if the block to be nested is a custom clock and this brings us to the end of the implementation of the inner block for nested content.
Testing and Debugging
Testing and debugging is a very important part of block building, it is crucial for ensuring that all errors and bugs are fixed right from their root cause. It also ensures that blocks are fully optimized, and it ensures that your blocks behave in the expected way in various scenarios.
Testing blocks in different environments: blocks can be tested in various environments ranging from the local environment, themes, various plugins, different WordPress versions, different browsers, different devices, different operating systems, and the like.
To test your block in the local environment: you install the script for building and testing blocks that are compatible with your local environment and run the test.
To test with various browsers, you can use Google Chrome, Mozilla Firefox, Safari, and likes. Use the developer tool of any of the above browsers to test your blocks for any errors or bugs.
Testing it for various WordPress versions:
Run your block in any of the WordPress versions be it the previous or latest version to test for bugs and errors. You can also test with themes like the Twenty-Twenty-one or Twenty-twenty-two.
Common Block errors or issues and how to debug them
- Issue of Compatibility: this is when there are conflicts with any of the themes, plugins, or other functionalities. To resolve the issue of non-compatibility, you make use of either Cross-Browser testing or step-by-step execution.
- Accessibility issue: This occurs when blocks are difficult to use with screen readers. Some blocks cannot be easily navigated using a keyboard. To solve any issue with accessibility, do manual testing, this is when you test your site using only your keyboard. Use a JAWS screen reader to test how your contents are being read.
- Issues of Performance: This is When the blocks are not loading fast. The technique most developers use in resolving this is the browser developer tool.
- We have the styling issues, Security issues, and Rendering issues. The techniques for resolving them include Console logging, network monitoring, and step-by-step execution.
Note: the issues and debugging techniques are not limited to the aforementioned.
Tools for testing and debugging block plugin
Here are some of the reliable testing tools because I have been using them for quite some time now. They include
- Jest: jest has proven to be very reliable regarding block testing. It is a Javascript testing framework maintained by Facebook. It has some built-in functions and a powerful mocking ability.
- Cypress: Cypress is a very reliable testing tool used for testing user flow and interactions. It is an end-to-end testing framework that provides a fast testing service.
Debugging Tools
They include:-
VScode: The VScode supports various programming languages including javascript, it uses code to identify and fix errors.
There are many other debugging tools they include. Logfile, PHP error debug, and many others.
However, I prefer using VScode for its programming capabilities.
Plugin for testing block development in WordPress
They include;
- WP test
- PHP unit
- WP browser
- MonsterInsight
Plugins for debugging
- Debug bar
- Query Monitor
- WP control
- WP logging
- User switching
- WP debug
Optimizing Block Performance
The performance of custom blocks or any other blocks can be optimized.
Optimization of performance is crucial for smooth running and maintaining the overall speed and user experience. It allows for quick loading.
Some of the best practices used in performance optimization include.
- Loading scripts and styles on pages only when needed to avoid unnecessary loading of scripts and styles where they are not needed.
- Avoid over-fetching: fetch only needed data
- Usage of cache
- Remove any unused CSS, JavaScript, or any other unused file.
- Testing is also one of the best practices for block optimization. It allows the auditing of performance.
- The handling of images in an effective way is also a way to optimize performance. The usage of Srcets and Size attributes for responsive images is very much encouraged.
- The network used for delivering content has to be considered also some CDNs are better compared to others. So it is advisable to evaluate which teCDN to use based on some factors like performance, cover features, and pricing.
- Others include profiling and optimized rendering. etc.
Deploying Your Block
After you have done your final review checking, your content accuracy, grammar and style, and must have performed various testing and debugging, the next thing to do is to deploy your blocks. Before deploying, make sure all necessary content is backed up. Then set up the environment to make sure it is ready for the new development. Deploy your block to a staging or testing environment and verify that it works perfectly with the testing environment and that the block integrates well with other components of the system, you conduct a final review deploy the code, and merge it into the main branch and drag it to the production server.
Writing documentation for your block
When writing documentation for your block, it is important to note your document structure, use simple language, highlight the important parts, and make use of images.
Here are the steps to take.
- Determine the end user of your documentation as this will help in your structuring.
- Gather and prepare relevant information like block features, block functionalities, etc.
- Outline necessary sections in the table of contents.
- Give a detailed description of how to configure blocks, and extend block functionality. It is advisable to use examples and snippet code in your description.
- You can provide answers to some FAQs.
- Then you draft your acknowledgement.
- Review and test your documentation.
Submitting your blocks to the WordPress Plugin Repository
After you have thoroughly tested your block to ensure it is stable and bug-free, and it adheres to WordPress coding standards and best practices, you include the (readme.txt) file and the (Plugin PHP), Javascript file, and likes.
To upload the plugin on wordpress.org, go to the WordPress plugin submission page, and fill out the form with your plugin details, including the plugin name, description, and a link to your plugin’s zip file, and submit. An approval mail will be sent to you it contains your SVN repository details.
Once your plugin is approved, Use the SVN to upload the plugin on wordpress.org and place your files & folders in the trunk folder.

Create a tag for release in the tags directory and verify if your file and information have been uploaded. Make sure that all files and information are correctly displayed. To do this, check your plugin page on the WordPress plugin repository.
Conclusion
In conclusion, when dealing with a block editor, there are some things you should always take note of and they include;
Having basic knowledge about block editors, and developing the right environment setup like node. js,npm, etc., pay close and meticulous attention to your block structure and component, and try as much as possible to make use of advanced customization like react, do not in any way forget to test and debug, styling and customization should be properly done, and write clear documentation and prepare your blocks for deployment making sure it complies to WordPress coding standard and submit to WordPress plugin repository.


")