This website uses cookies so that we can provide you with the best user experience possible. Cookie information is stored in your browser and performs functions such as recognising you when you return to our website and helping our team to understand which sections of the website you find most interesting and useful.
Notification Send To All Users About There Data Breaches

Sandeep Kumar Mishra
in
Plugin Docs > WP GDPR Pro
November 13, 2021
5 minutes read
This step-by-step guide will empower you to craft and send notifications to all users in the event of a data breach, fostering a secure and responsible online environment. Join us in navigating the complexities of notifying users, ensuring compliance with regulations, and maintaining a proactive approach to data breach management.
Follow these simple steps to set up this plugin:
Step 1: Install & Activate WP GDPR Pro Plugin.
Step 2: Please navigate to the “WP GDPR Pro-> Data Breach Notification” in the plugin’s navbar.
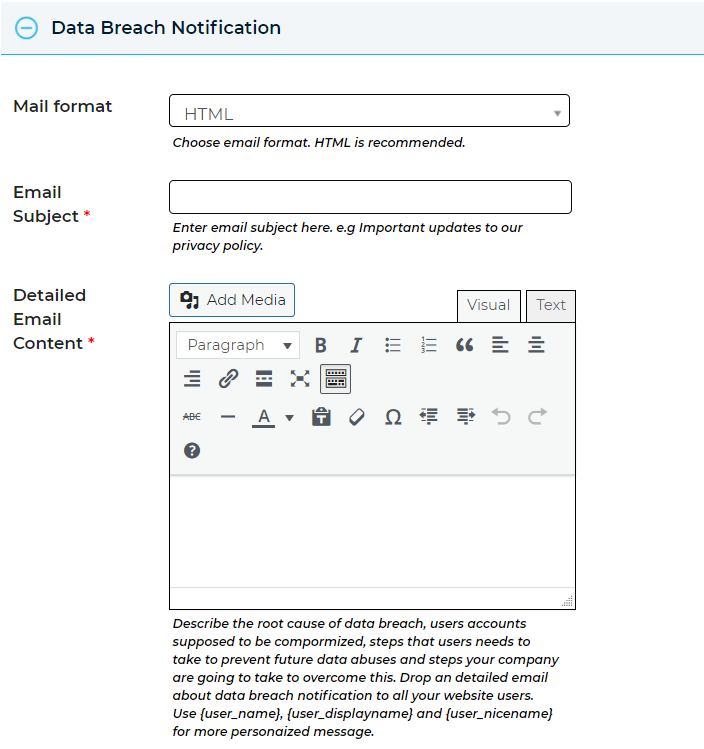
Step 3: Please navigate to the “Data Breach Notification” tab section. Here you will see an email format fill it.
Describe the root cause of data breach, users accounts supposed to be compromised, steps that users need to take to prevent future data abuses, and steps your company is going to take to overcome this. Drop a detailed email about data breach notification to all your website users.
Use {user_name}, {user_displayname} and {user_nicename} for more personalized message.
Step 4: Please navigate to the “Choose Recipients” section to choose recipients and recipient types.
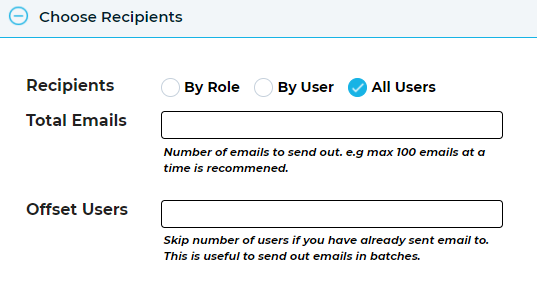
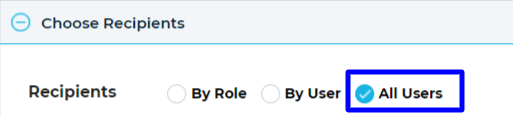
Step 5: Please navigate to the “Recipients” tab in this section and select “All Users” from this tab.
Step 6: Please navigate to the “Total Emails” textbox and insert the total user number here.

Step 7: Please navigate to the given “Offset Users” textbox and insert any number to skip a number of users if you have already sent an email. This is useful to send out emails in batches.

Step 8: Please navigate to the “Sender Setting” section on this page and fill required sender detail.
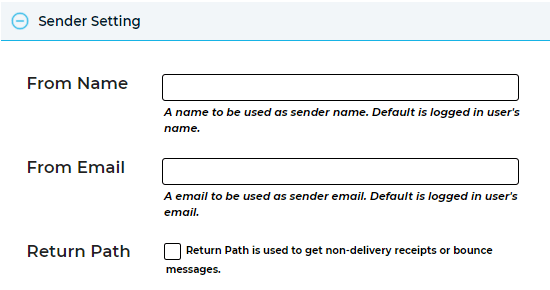
Step 9: Please navigate to the “From Name” textbox in this section and insert a name to be used as the sender name.

Step 10: Please navigate to the “From email” given textbox in this same section and insert an email to be used as the sender email.

Step 11: Please navigate to the “Return Path” tab and enable this checkbox as per your requirement. this return path checkbox is used to get non-delivery receipts or bounce messages.

Email Testing:
Step 12: Please navigate to the “Testing Email” section and enable the given “Test Email” checkbox to send a copy of the email to yourself before sending it out to users.

Step 13: After this small process please click on the “Notify Users” button to send an email to your selected specific recipients.
Explore the latest in WordPress
Trying to stay on top of it all? Get the best tools, resources and inspiration sent to your inbox every Wednesday.