Vagrant for WordPress development comes to mind when you think about your difficulties in sharing the same development environment between developers. Sometimes a few things work on your PC but not on your client’s PC or on the live server. To rectify such issues, we need the same server environment to see what exactly is happening on the other side.
At WePlugins, by using Vagrant, we improved our development speed and accuracy. This article is about why we adopted Vagrant, what the results are, and how you can achieve the same.
Why Vagrant for WordPress Development?
Vagrant helps make your WordPress development cycle dramatically easier. Below are the reasons we prefer Vagrant for every WordPress project.
- Mismatch Server Configurations: Server configuration is often different from our local environment, causing conflict issues that are hard to resolve.
- Difficult Sharing: There are too many steps to configure everything locally to match with a teammate, isn’t there?
- Repeatable Steps: Copying the WordPress core folder, creating a new database using PHPMyAdmin, setting up wp-config.php, and so on are repeatable steps we need to do to start a WordPress project. It’s boring.
Benefits of Vagrant in WordPress Development
Profit is the backbone of every business, and Vagrant helps us speed up development, enabling more projects in a month and more profit. Below are the advantages of Vagrant we experience every day.
- No Excuses Anymore: “Works on my PC”, “Your server is not compatible”, “It’s not happening for me”, and many more excuses happen in IT. Vagrant sets up an exactly same development environment for everyone and makes it easy to switch between environments.
- Development Time: The “vagrant up” command can set up everything for you, allowing you to start writing your code immediately.
- Easy Collaboration: You no longer need to share hundreds of files. Just a configuration file and “vagrant up –provision” takes care of the rest.
- Command Line Interface: Vagrant reduces our mouse clicks and lessens the need to switch between the editor and browser due to its command line interface for WordPress development.
Set Up Your First Project Using Vagrant
Ready for your first WordPress project using Vagrant? Let’s do it in steps. Assume that you just purchased a new laptop with no software or tools installed on your system. This is an ideal situation to get started with something new.
- Step 1: Install VirtualBox, which is required for Vagrant to switch between server environments.
- Step 2: Install Vagrant in a few easy steps. At the end, make sure the “vagrant” command is available in your terminal.
- Step 3: It is a best practice to use provisioned domains (first_project.dev or first_project.com) instead of the “http://localhost/first_project” root URL. For that, install the vagrant-hostsupdater plugin with:
$ vagrant plugin install vagrant-hostsupdater
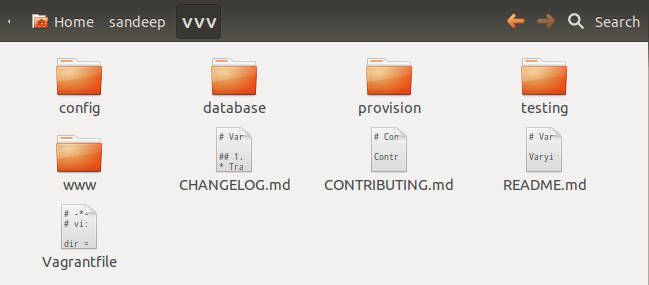
- Step 4: Up to now, your system only has Vagrant and VirtualBox. No XAMPP/LAMPP. Now download this Varying Vagrant Vagrants project and extract it anywhere you wish to put your projects. We’re assuming the VVV folder for the rest of this article. You should see a folder structure as below.

- Step 5: You might wonder how it works without XAMPP/LAMPP, which was an essential part of your development life. Now open the terminal, navigate to the VVV folder, and run “vagrant up”.
VVV$ vagrant up
This could take a while to run the first time because it downloads the required files. Once the installation is complete, you get all the tools required for development listed here.
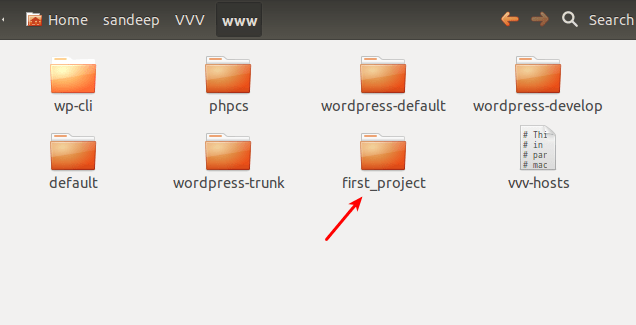
- Step 6: Up to now, you have everything that you need and won’t need these steps again in the future. For your first WordPress project, create a new folder “first_project” in the “www” folder.

- Step 7: Create a file vvv-init.sh and paste the following code in it.
mysql -u root --password=root -e "CREATE DATABASE IF NOT EXISTS first_project";
mysql -u root --password=root -e "GRANT ALL PRIVILEGES ON first_project.* TO root@localhost IDENTIFIED BY 'root';";
if [ ! -d wp-content ]; then
    wp core download --allow-root;
    wp core config --dbname="first_project" --dbuser="root" --dbpass="root" --dbhost=localhost --allow-root;
    wp core install --url="first_project.dev" --title="First Project" --admin_user=admin --admin_password=123456 --admin_email=youremail@email.com --allow-root;
fi
- Step 8: Create a second file vvv-hosts and paste the following content in it.
# This is the domain we'll use instead of http://localhost/first_project
first_project.dev
- Step 9: Now create a third and last file vvv-nginx.conf and paste the below code in it.
server {
    listen 80;
    server_name first_project.dev;
    root {vvv_path_to_folder}/;
    include /etc/nginx/nginx-wp-common.conf;
}
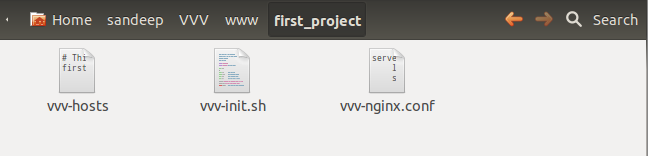
- Step 10: So, your first_project should have the following structure.

- Step 11: Up to now, you have set up your project configurations. Now run “vagrant up”. In a few minutes, it’ll be ready for your new development project, and you can browse http://first_project.dev on your browser.
Conclusion
It took me a complete day when I tried Vagrant for the first time and set up these steps, but now it takes only a minute to set up a new WordPress project and start my coding. For example, if you wish to distribute this project to your team, just copy these three files and send them to them. If you want to create a second project, just copy these three files into a folder and change your settings. At the end, run “vagrant up”. Hopefully, this article is worthwhile in your WordPress development.